What do we use it for?
Over the air packet captures are a extremely useful when we talk about wireless, well of course, if you know about the packet exchange so be sure to check out section for this. (Once is ready that is, should be soon enough)
For some of you this might be basic, but I always like to take a step back so we don't leave any gap by assuming this has been studied before. The packet capture work pretty much as it does in wired, it will allow us to see any packet that comes into the medium; and right here is the catch, remember that wireless is a half-duplex communication? That is due to its shared medium that any device connected to it can send packets while it is available.
Sniffing the air
As funny as it sounds we are going to sniff the air, on the proper frequency where we are "talking" to our devices of course. So while we access our medium, the air, it might be worth mentioning once more that in Wi-Fi we have different bands and different channels, these naturally are regulated by authorities depending on where you are located; we are not going to fixate on that but be sure to know which band (2.4 GHz, 5GHz, 6GHz among the most popular bands) and channel you are connecting to.
Always when you are sniffing an encrypted network with PSK make sure you capture the initial connection and the 4-way handshake. Here are two ways you can do it. Let's start with the simple one.
Using a Macbook
In here you have 3 options to go
Airtool
For this one you need to gather the following tools
- An Apple Macbook
- Airtool installed
- Channel of the AP you're trying to sniff and channel width
- Start Airtool

- Select Channel and Channel Width
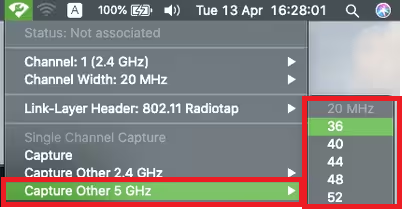
- Wait for the information to be captured
- You will find the capture file on the desktop with a .pcap extension
Wireless diagnostics tool
As per usual let's gather your tools first, here is what you need
- An Apple Macbook with a 10.14.x version or later
- Apple wireless diagnostic
- Make sure your Airtool is at the latest version
- Channel of the AP you're trying to sniff and channel width
- Open the wireless diagnostic tool

- Select Window - Sniffer

- Select the Channel and Channel Width

- Click Start

- Reproduce the behavior you are trying to capture and once you're sure it has happen click on the Stop

- To open the file go to Finder
- Select Go and type /var/tmp and you will get the folder where the capture was stored

Wireshark
As per usual let's gather your tools first, here is what you need
- An Apple Macbook
- Wireshark
- Channel of the AP you're trying to sniff and channel width
- Open wireshark
- Press Capture on the top menu and select options

- On the en0 adapter select Monitor
- Click Start

Image from Cisco.com
- Save the capture in any folder you want
Using an AP and the WLC
AP
- A dedicated AP on the area to review
- Remote computer with wireshark or other packet capturing software
Follow the next steps on your WLC GUI
- Go to Configuration -> Wireless -> Access Points
- On the section look for your AP and click it
- In the Edit Radios -> Configure -> Sniffer Channel Assignment section, check the Sniffer Channel Assignment checkbox to enable
- From the Sniff Channel drop-down list, select the channel
- Enter the IP address in the wireshark running computer.
- Click Update & Apply to Device.
- Let the magic happen
Meanwhile the remote computer should be running the packet capture software in promiscuous mode, usually the CWNP methodology in packet captures mention that is better to have the software all the packets and do the filter after; in this particular case my suggestion is to apply a capture filter for udp port 5555 before hand and only capture the traffic that comes from the AP.

Assuming that everything when correctly stop the capture on the wireshark, save your file and now it only needs to be decoded; to do so right click on the packets and select decode as, once it opens the new screen click the "+" and add the PEEKREMOTE on the drop down menu all the way to the right.


No comments:
Post a Comment